Blob Presigned URLs
It is now possible to upload files to your R2 bucket using presigned URLs with zero configuration.
It is now possible to upload files to your R2 bucket using presigned URLs with zero configuration.
Why presigned URLs?
By allowing users to upload files to your R2 bucket using presigned URLs, you can:
- Reduce the server load
- Direct client-to-storage uploads, saving bandwidth and costs
- Use a secure and performant way to upload files to your R2 bucket
- By-pass the Workers limitation (100MiB max payload size) using regular upload
How does it work?
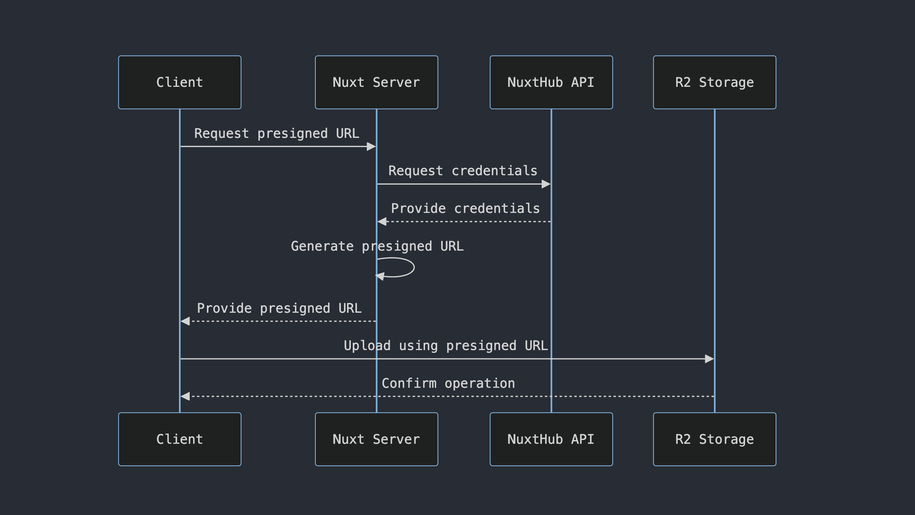
This is a diagrame of the process of creating a presigned URL and uploading a file to R2:
In order to create the presigned URL, we created the hubBlob().createCredentials() method.
This method will create temporary access credentials that can be optionally scoped to prefixes or objects in your bucket.
const {
  accountId,
  bucketName,
  accessKeyId,
  secretAccessKey,
  sessionToken
} = await hubBlob().createCredentials({
  permission: 'object-read-write',
  pathnames: ['only-this-file.png']
})
With these credentials, you can now use the aws4fetch library to create a presigned URL that can be used to upload a file to R2.
import { AwsClient } from 'aws4fetch'

// Create the presigned URL
const client = new AwsClient({ accessKeyId, secretAccessKey, sessionToken })
const endpoint = new URL(
  '/only-this-file.png',
  `https://${bucketName}.${accountId}.r2.cloudflarestorage.com`
)
const { url } = await client.sign(endpoint, {
  method: 'PUT',
  aws: { signQuery: true }
})
Alternative
If you don't want to use presigned URLs and want to upload files bigger than 100MiB, you can use the NuxtHub Multipart Upload feature.